A practical Guide for Finding Elements with Selenium
This article is for anyone who is using Selenium or Endtest and wants to know the best ways to find elements.
The key here is to find the most stable and reliable locator for each element.
Keep in mind that asking Selenium to locate an element is like telling someone from out of town how to find a certain coffee shop in your city.
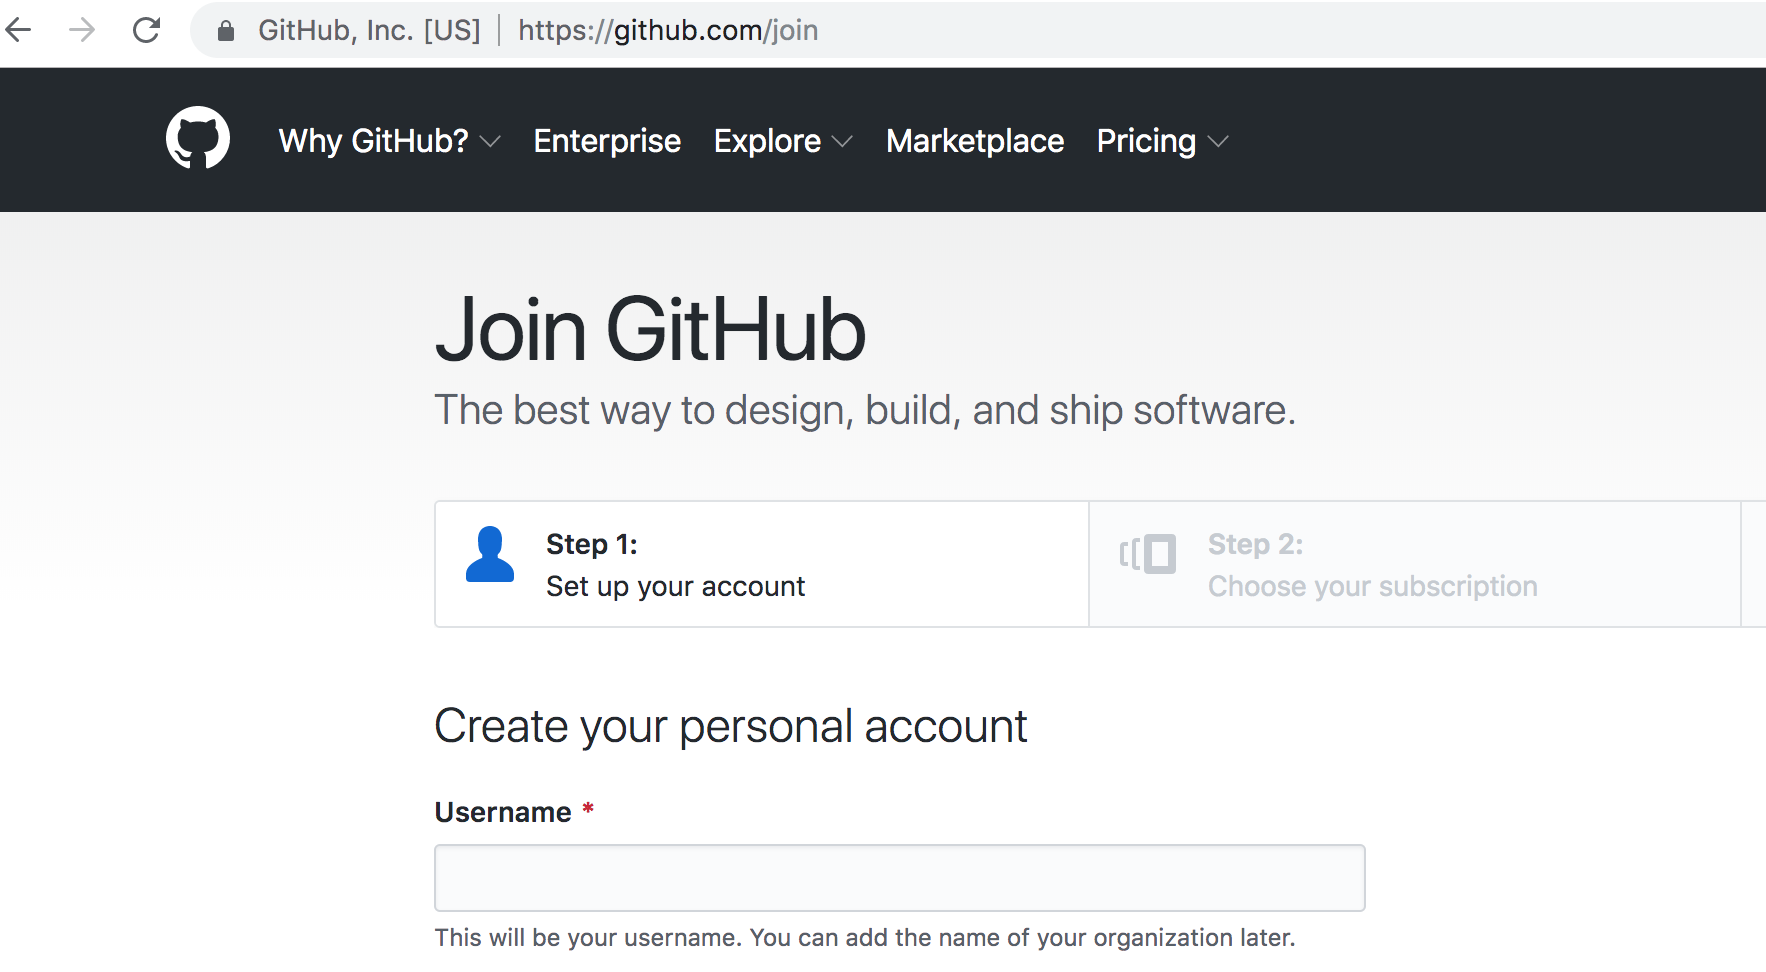
We'll be using the Github Sign Up page as an example.
I'll also be making some comparisons between Selenium and Endtest:
Even if you are using our Endtest Chrome Extension to locate your elements, you might still encounter situations where you need to fetch a locator.
We're going to use different locator types to find the Username input:
- Find Element By ID
- Find Element By Name
- Find Element By Class Name
- Find Element By XPath
- Find Element By CSS Selector
- Find Element By Link Text
- Find Element By Partial Link Text
- Find Element By Tag Name
1) Find Element By ID
Always the first choice.
In order to get the ID of your element, you just have to right click on your element and click on the Inspect option.

The structure of your element will be highlighted in the console:
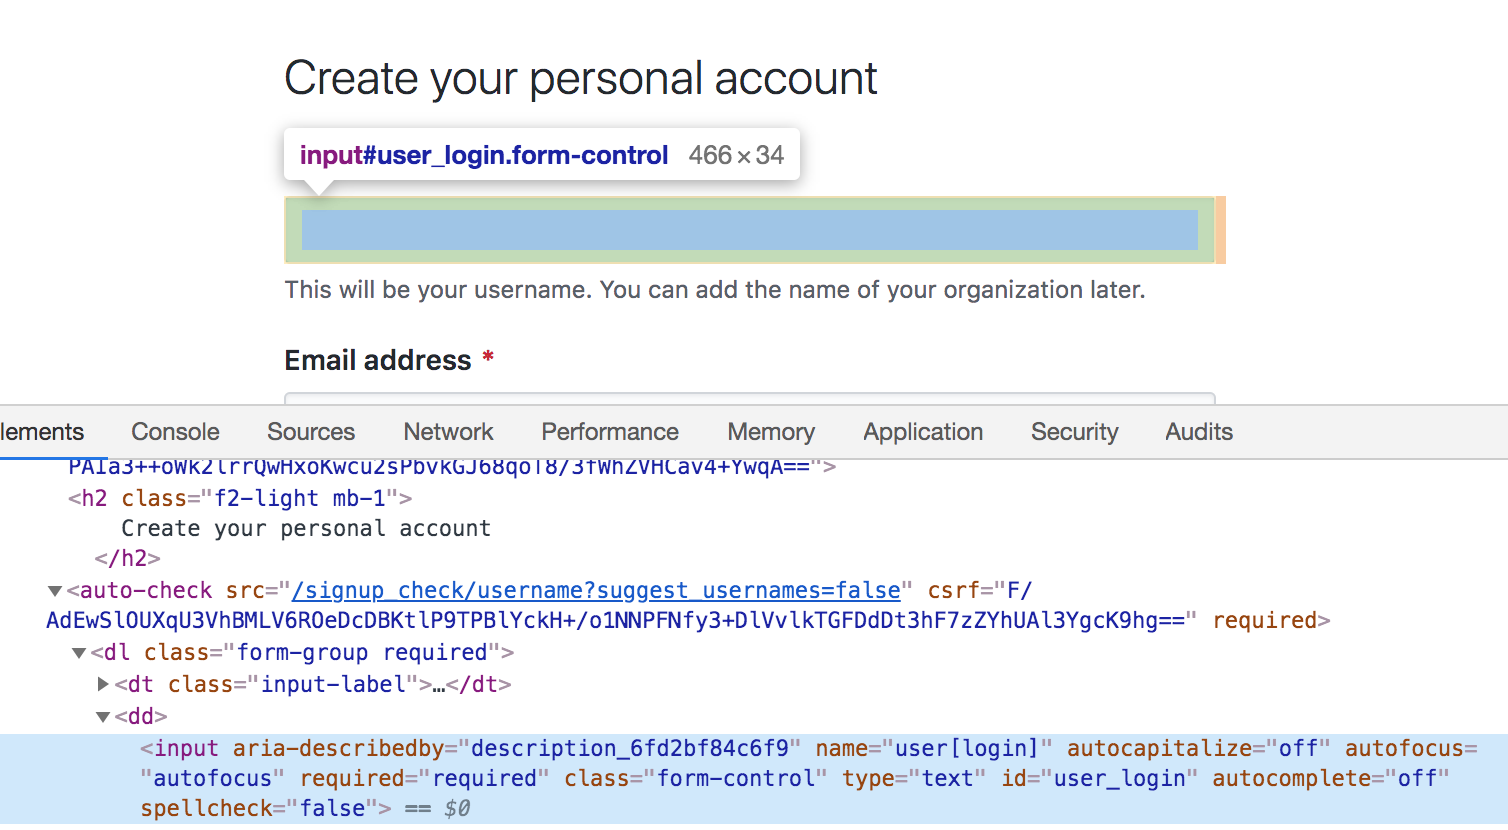
It seems that our element has the following ID:
user_login
This means that your line of code will look like this:
username = driver.find_element_by_id("user_login")
Since an ID should be unique on a page, it's the most reliable locator type that you can use.
It's like having only one Starbucks in your city and telling your friends to meet you there, they can't miss.
2) Find Element By Name
Just as good as ID, but you won't encounter it as often as you'd expect.
Elements from forms usually have the Name attribute.

We can easily see that our element has the following Name:
user[login]
username = driver.find_element_by_name("user[login]")
3) Find Element By Class Name
Not so reliable, since a Class Name is usually shared by multiple elements.
We can easily see that our element has the following Class Name:
form-control
And if we take a closer look at the rest of the inputs from that form, we'll see that all of them have the form-control Class Name.
username = driver.find_element_by_class_name("form-control")
This means that the you won't be able to locate that Username input with the Class Name locator type, since Selenium will throw an error.
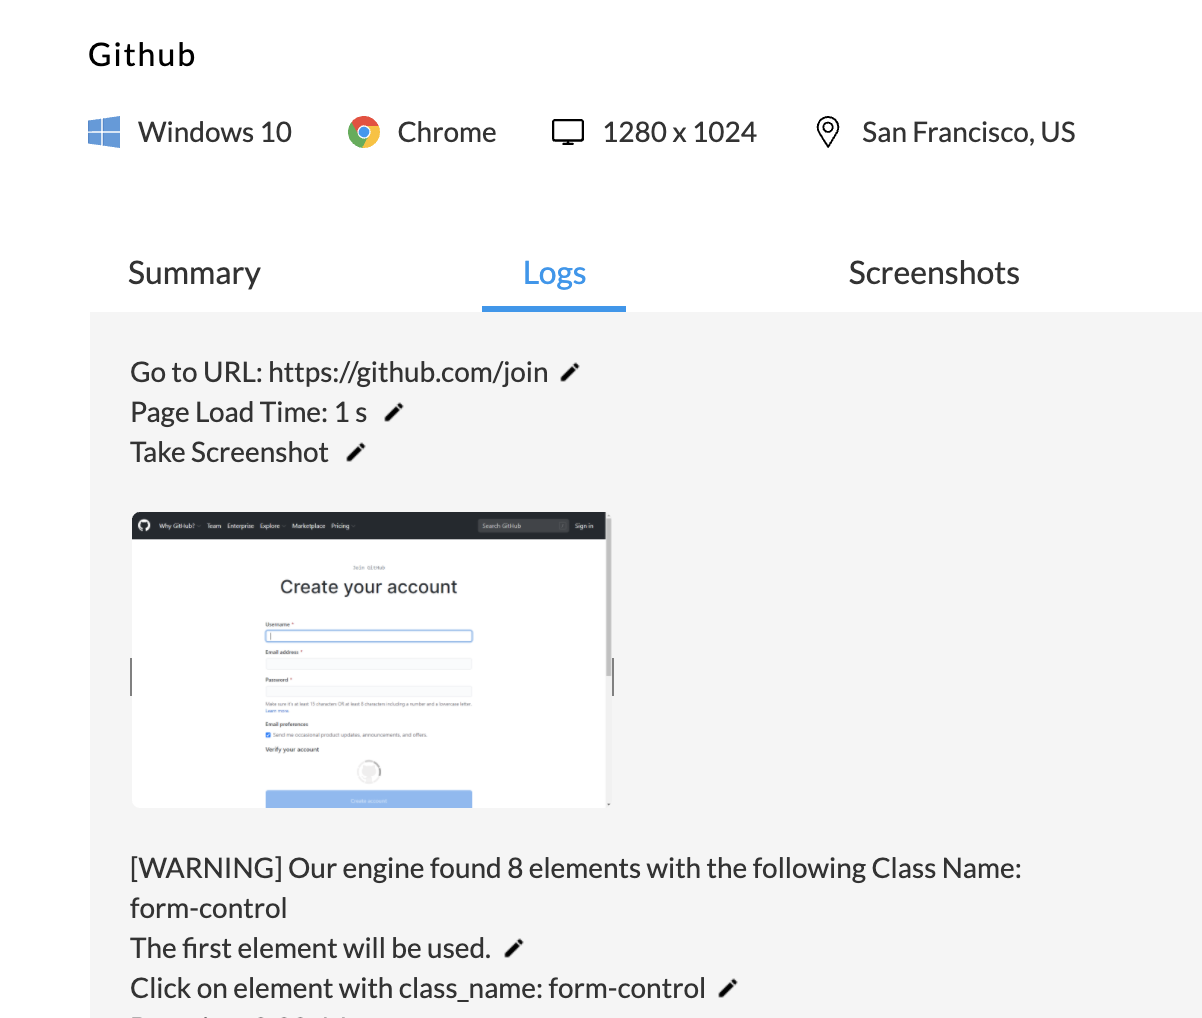
Endtest has a more elegant approach here than Selenium. If you provide that Class Name, it will only give you a warning, telling you how many elements it found with that Class Name and that the first one will be used.
If Starbucks had a Class Name, it would probably be coffee-shop. If you tell your friend Meet me at that coffee shop, they might not know which one you're talking about.
The most common mistake done by beginners is extracting all the Class Names instead of just one.
Let's take a look at this element:

A novice user might say that the element has the following Class Name:
HeaderMenu-link d-inline-block no-underline border border-gray-dark
But it actually has 5 different Class Names:
HeaderMenu-link d-inline-block no-underline border border-gray-dark
That's right, Class Names are separated by spaces.
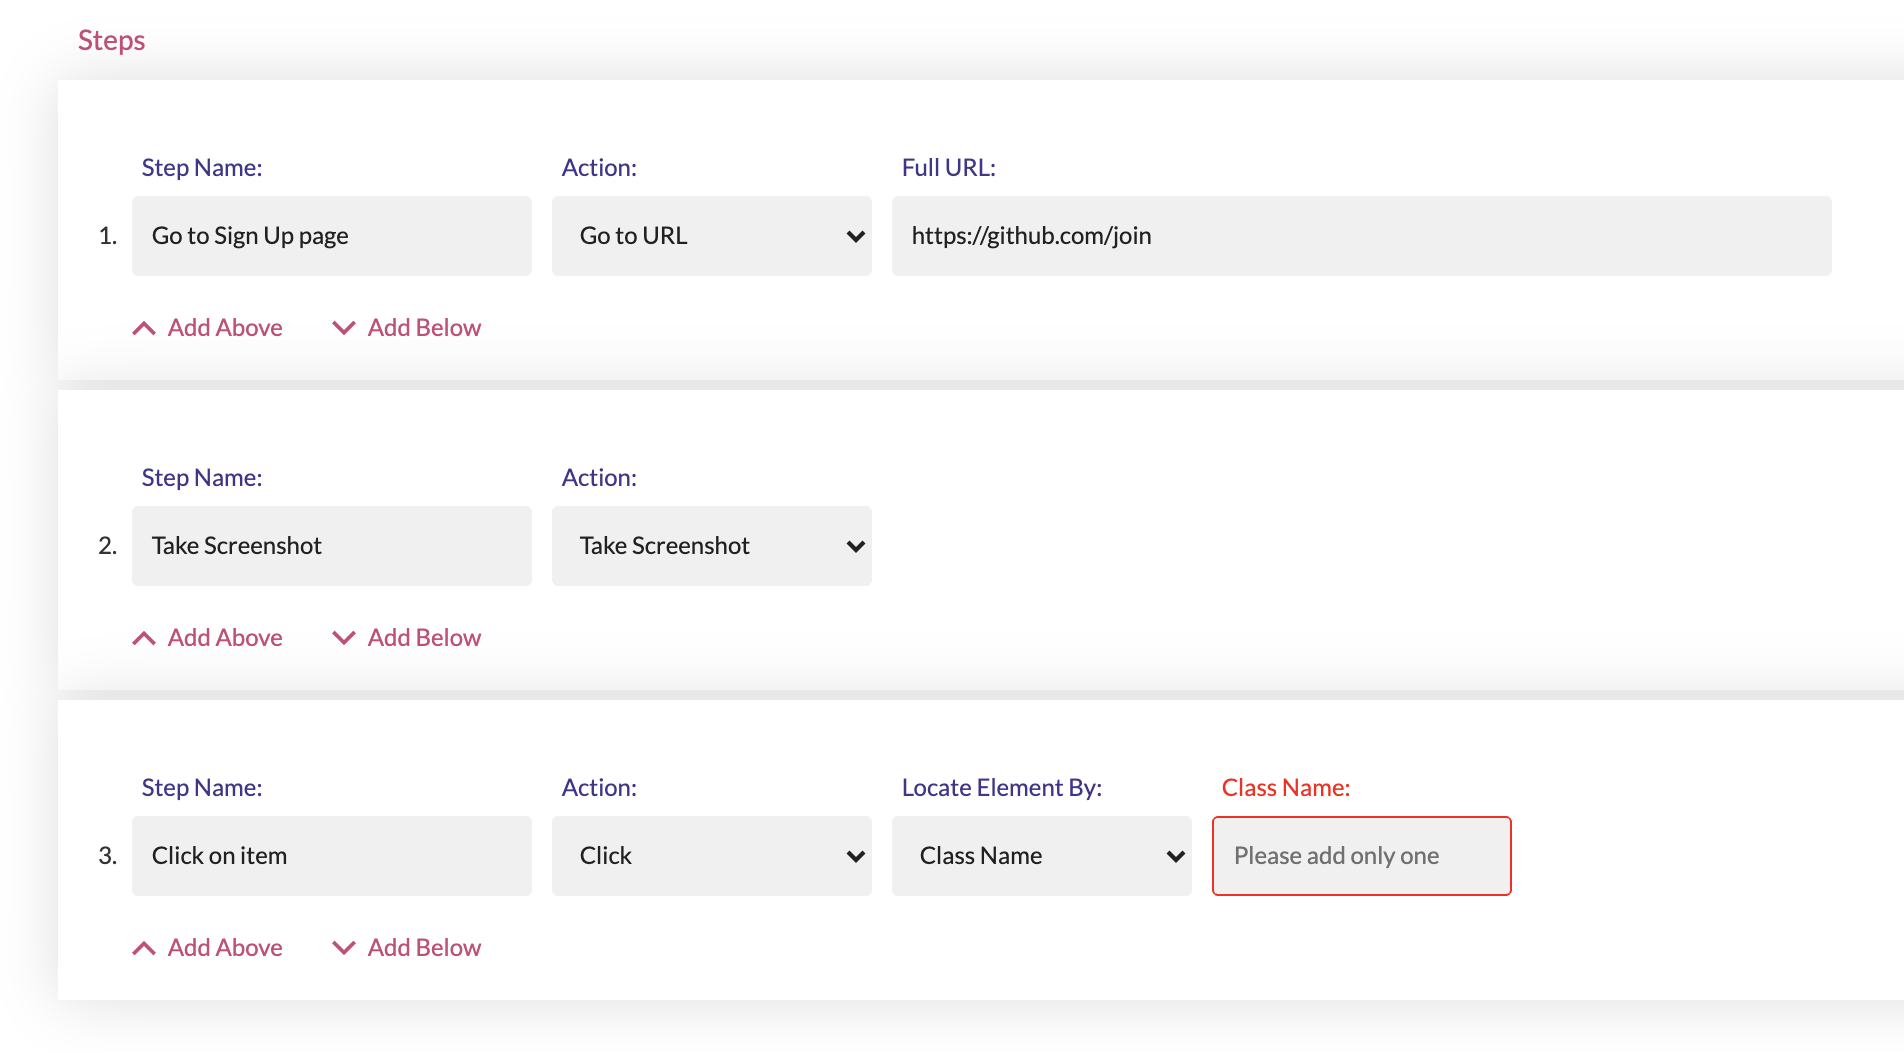
Selenium does not have a validation for that, but Endtest does:
4) Find Element By XPath
You simply can't avoid having to use XPath for at least some elements. It's not as bad as they say.
An XPath is like a route. There are a lot of routes that your friend can take to get to that Starbucks.
Usually, an XPath looks something like this:
/html/body/div[4]/main/div/div/div[1]/p
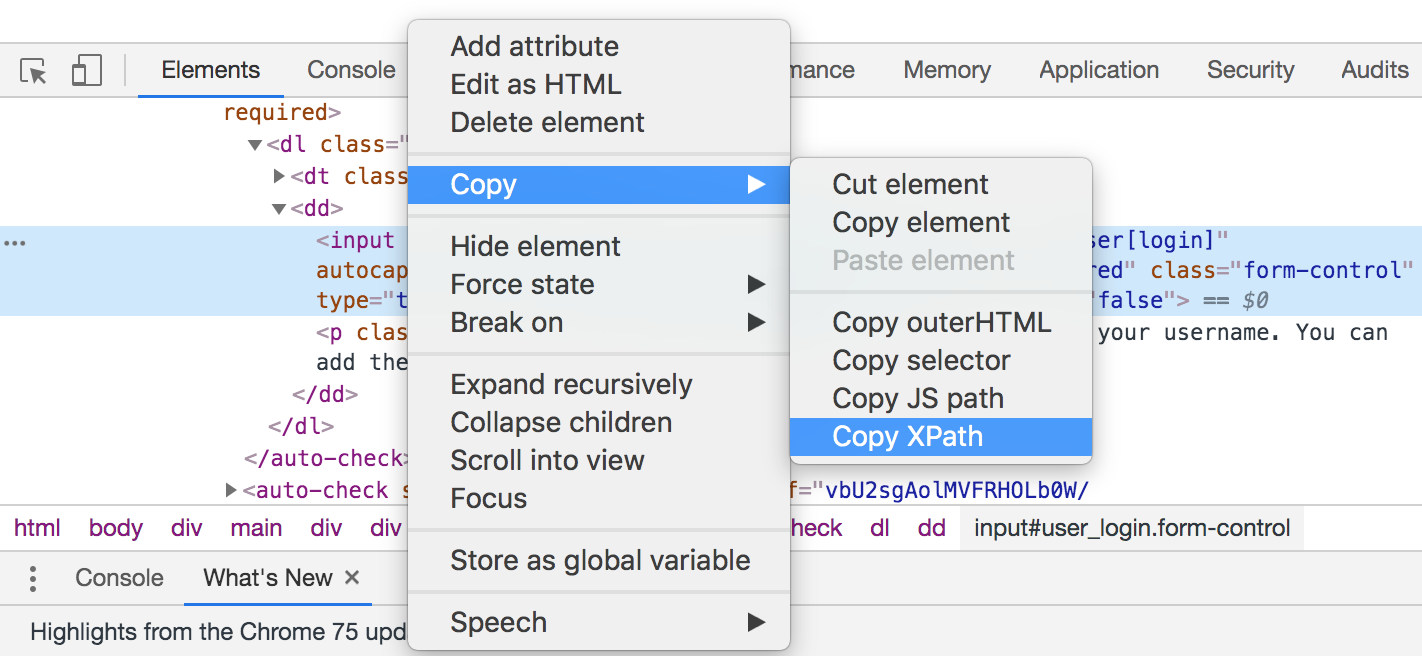
The fastest way to get the XPath is from the Chrome console:
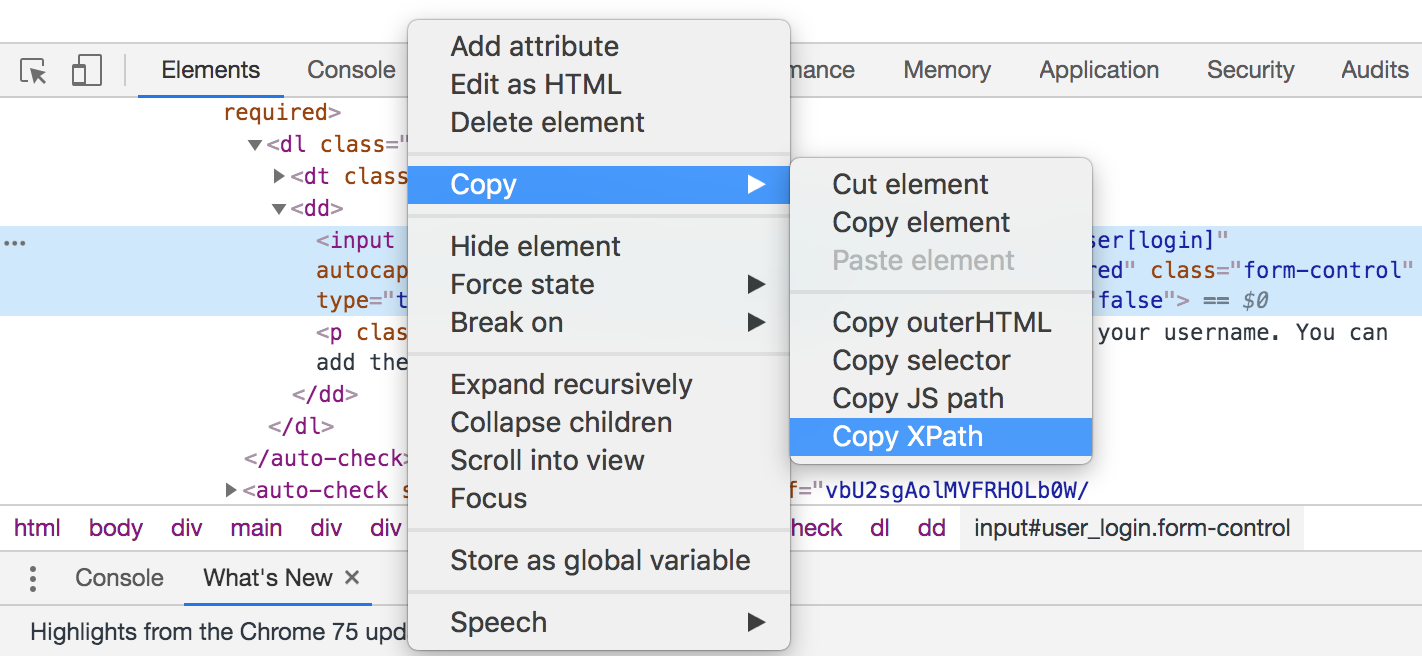
In this case, we got the following XPath:
//*[@id="user_login"]
If you have a stable ID, you shouldn't bother to use XPath.
And if you don't have a stable ID, the XPath that we got is not reliable.
There are lots of web applications which are using dynamic IDs for some elements.
An element with a dynamic ID is like a coffee shop which is changing its name every day.
You know that the coffee shop was called iCoffee yesterday, but you have no idea what name is it going to have today.
Telling your friend to meet you at iCoffee will be confusing.
That's when we need to write our own XPath.
Find out what are the stable attributes and characteristics of that element.
Going back to the example with the coffee shop that has a different name.
What is something that doesn't change about it?
Perhaps the location and the fact that it's a coffee shop.
This means that you can tell your friend from out of town to meet you at the coffee shop from the West Shopping Mall.
Let's take a look at our element and get the XPath of its parent:

This is the XPath that we got for its parent:
//*[@id="signup-form"]/auto-check[1]/dl/dd
This is practically the address of the West Shopping Mall in our example.
Now all we have to do add some details at the end.
Our Username element is an input and it has the form-control Class Name.
This means that we need to append the following to the parent:
/input[@class="form-control"]
And that part translates to: Look in that parent for an input which has the form-control Class Name.
And the final XPath for our Username element will look like this:
//*[@id="signup-form"]/auto-check[1]/dl/dd/input[@class="form-control"]
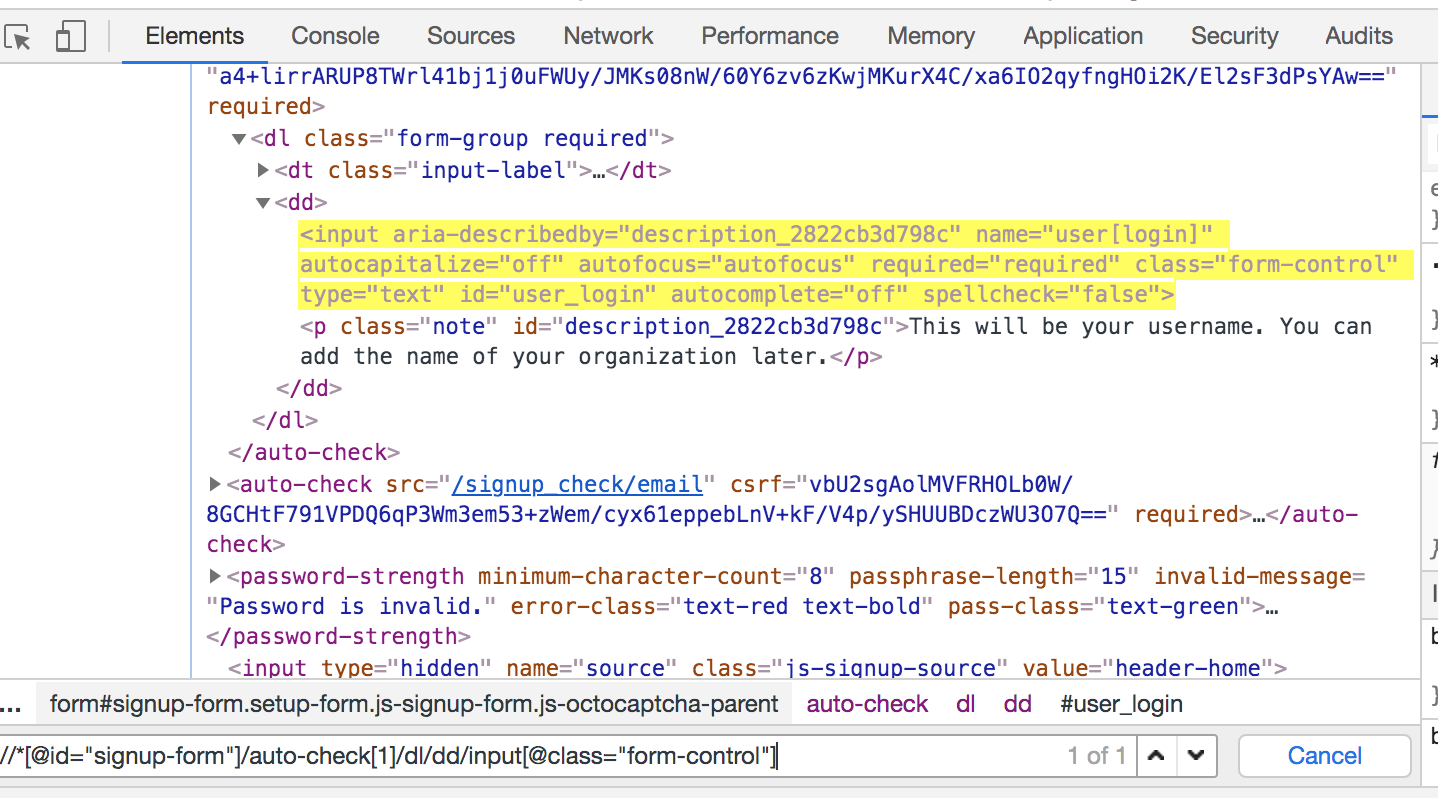
Always verify your XPath in the Chrome console by hitting Ctrl + F and searching for it, you should see your element highlighted like this:
Writing your own XPaths isn't so scary. You will encounter situations where your element might not have an ID, but it will have a certain reliable attribute which makes it unique.
In that case, your XPath will look like this:
//*[@attribute = "attribute_value"]
You can also write an XPath which locates the element by using only part of the value of the attribute:
//*[contains(@attribute, "part_of_attribute_value")]
For example, our Username element has the following attributes:
aria-describedby="description_2822cb3d798c" name = "user[login]" autocapitalize = "off" autofocus = "autofocus" required = "required" class = "form-control" type = "text" id = "user_login" autocomplete = "off" spellcheck = "false"
If we want to use the aria-describedby attribute, this will be the XPath:
//*[@aria-describedby = "description_2822cb3d798c"]
If you're using Endtest instead of Selenium, their recorder will know how to automatically extract these custom XPaths.
5) Find Element By CSS Selector
The CSS Selector locator type is similar to XPath.
Some people actually claim that it's faster.
Usually, a CSS Selector looks like this:
body > div.application-main > main > div > div
And we extract it in a similar way:
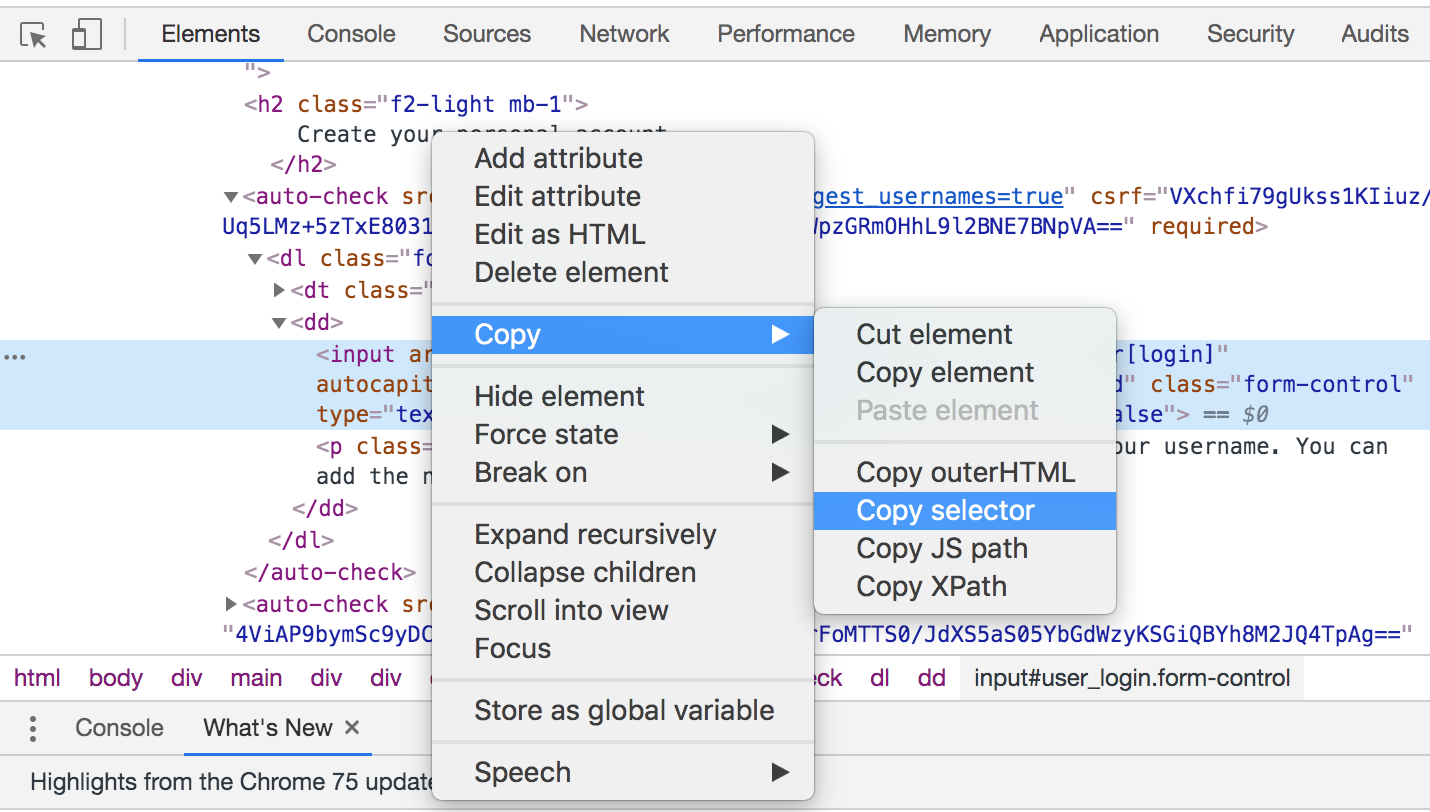
In this case, we got the following CSS Selector:
#user_login
If you're familiar with CSS, you'll know that # stands for ID.
The similarities with XPath don't stop here.
If you have a stable ID, you shouldn't bother to use CSS Selector.
And if you don't have a stable ID, the CSS Selector that we got is not reliable.
The solution?
To write our own custom CSS Selector.
Let's start by extracting the CSS Selector for the parent of the Username element:

This is what we get:
#signup-form > auto-check:nth-child(4) > dl > dd
Now, just like we did for XPath, we need add some details at the end.
In case you forgot, our Username element is an input and it has the form-control Class Name.
This means that we need to append the following to the parent:
> input.form-control
And that part translates to:
Look in that parent for an input which has the form-control Class Name.
If you're familiar with CSS, the dot stands for Class Name.
And the final CSS Selector for our Username element will look like this:
#signup-form > auto-check:nth-child(4) > dl > dd > input.form-control
It's not mandatory to add both the element type and the Class Name.
You can just use one of them:
#signup-form > auto-check:nth-child(4) > dl > dd > input
#signup-form > auto-check:nth-child(4) > dl > dd > .form-control
Again, if you're using Endtest instead of Selenium, their recorder will know how to automatically extract these custom CSS Selectors.
6) Find Element By Link Text
The Link Text locator type only works for links.
Your element is a Link if it has the following format:

The a stands for Anchor.
Since our Username element is an input and not a link, we won't be able to locate it by using Link Text.
It's worth remembering that the Link Text is only the text between the tags.
In the case of the link from the screenshot, the Link Text is Enterprise.

Our Selenium code would look like this:
enterprise_link = driver.find_element_by_link_text("Enterprise")
7) Find Element By Partial Link Text
As the name suggests, it's exactly like Link Text, but with the difference that you only need to add part of the Link Text.
And this would be our Selenium code:
enterprise_link = driver.find_element_by_partial_link_text("Enterp")
8) Find Element By Tag Name
As we have seen from the previous examples, an element always has a tag.
You can use the Tag Name locator type if that's the only unique characteristic of the element that you can grab on to.
Realistically speaking, I don't think you'll ever use this one.
Endtest has an extra locator type, Text Inside, similar to Partial Link Text, but it works for all types of elements.
Even if your locators are reliable, you will encounter situations where your web application goes through a revamping and you'll consume time on keeping your tests in sync with your web applications.
One option to avoid this situation is to use Self-Healing Tests.


